Tuesday, 11 September 2018

Moving day!

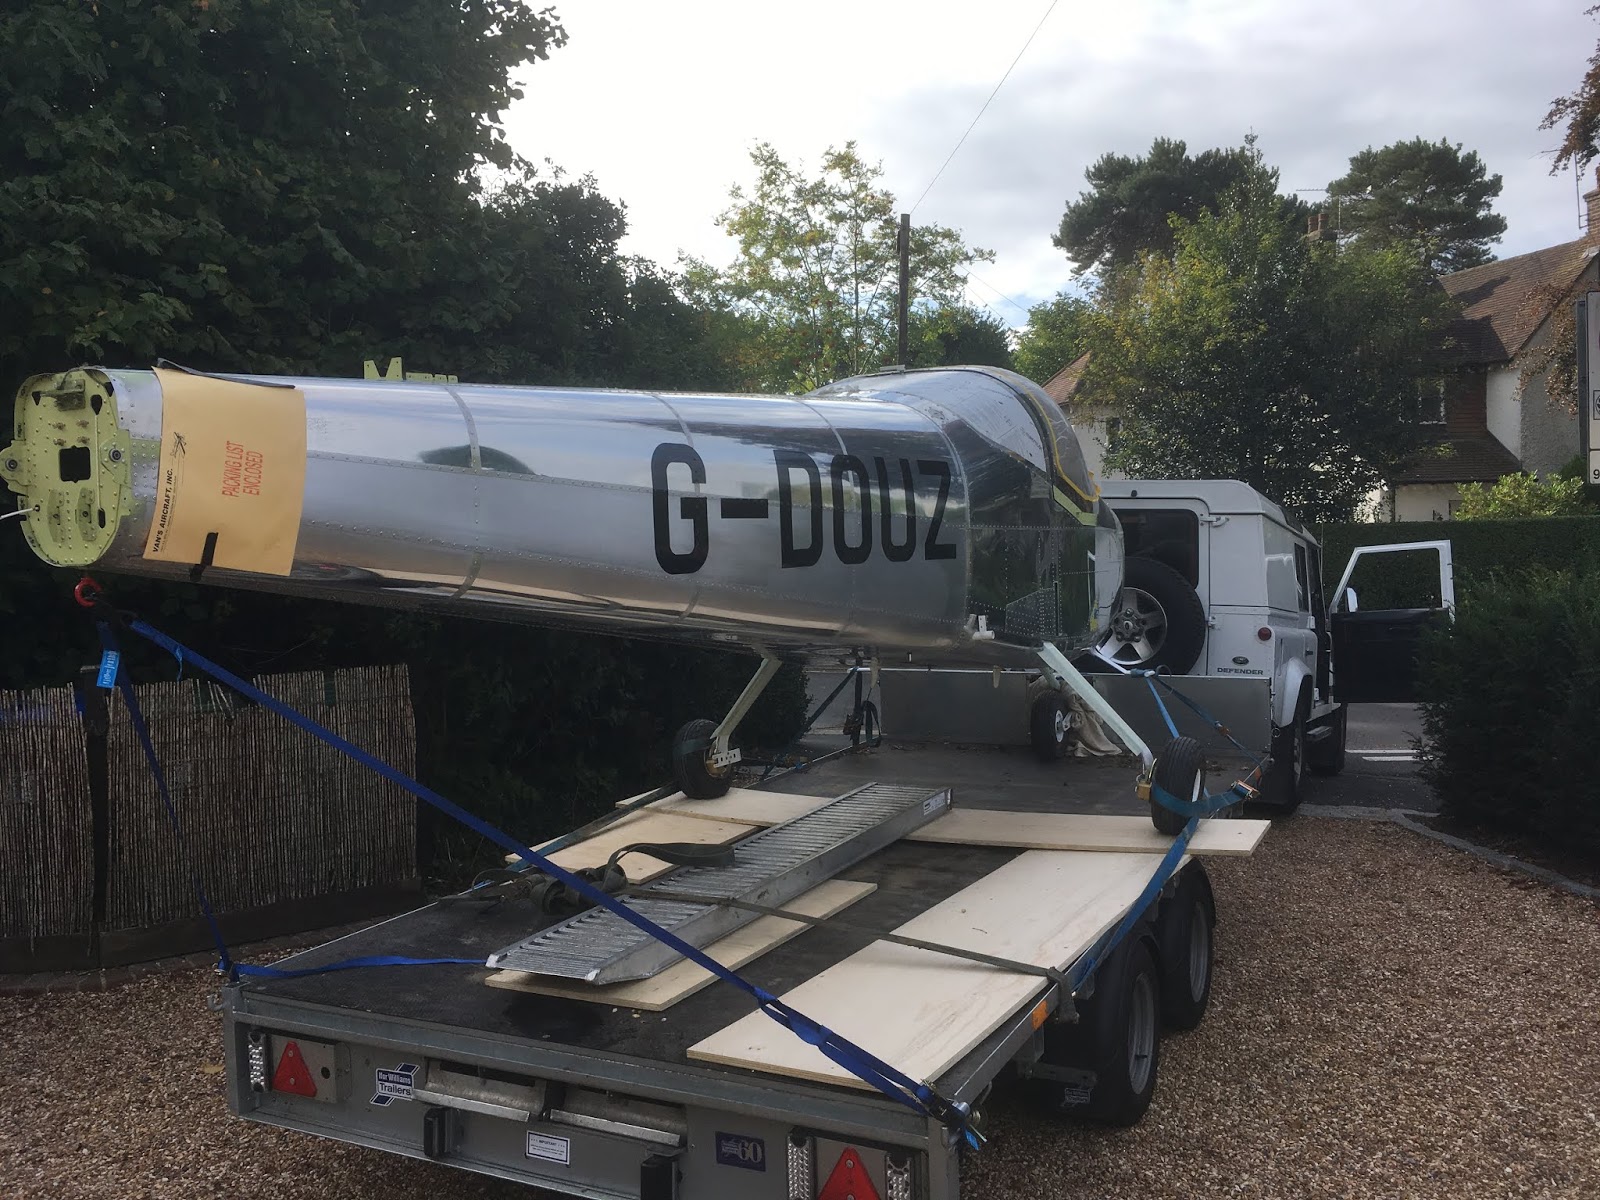
The aircraft finally moved to Fairoaks today.  Hassle-free fortunately and with many thanks to Jon and Dave for their time and to Dave for supplying the trailer and his Landrover.

First the fuselage.  As you may notice, the aircraft wheelbase is slightly wider than the trailer bed, making for interesting loading!  It worked fine with some sheets of plywood I had lying around.   Dave had brought an extra ramp with the trailer so that sorted the nose-wheel.  It got the attention of the neighbours and plenty of looks as we drove to the airfield.

 Arrival at Fairoaks - just got to negotiate the air side gate.

Second trip - this time the wings and horizontal stabiliser.  I hadn't considered using the wing rack for transport as I only made it for easy storage and rolling around the garage.  With one extra brace and well secured with straps it did the job fine.  The stabilator is on the bed of the trailer beneath the wings and wrapped in garden chair cushions and a blanket!

 Wings on their way.

 I made another trip by car to deliver the fin and rudder along with tools and boxes of parts.  Then immediately on to assembly with the empennage.

End of the day, with the RV12 in it's proper home and starting to look like a complete aircraft.  I have the anti-servo tab to install and then to connect the trim servo, rudder and elevator cables and do the rigging and tensions.  

Sunday, 26 August 2018

Construction at home completed!

Well it's only been a week since the last blog post, but I've been very active and have completed all outstanding construction tasks that can be done at home. 

So to start with this week, I completed the undercarriage and wheel fairings.

 Here's the completed nose-wheel fairing.  Actually I've made one change since taking the picture in that I've countersunk the holes joining the two halves and I'll use Tinnerman washers and AN507 countersink screws for a flush finish.  I've now also done this to the main gear fairings and the tailcone halves.

A close-up of the nose gear fairing showing the internal hinge which keeps the trailing edge closed, and the hinge-pin bracket which keeps it from coming part.  A really fiddly job the get the hinge installed and riveted in place.

Next onto the main gear leg-fairings.

Here's the right main gear with the completed wheel fairing installed and the transition fairing cleco'd to hold the leg fairing.  The lower transition fairings fit very well but quite a lot of work was needed to get the upper ones to line up against the fuselage.  The leg and transition fairings aren't standard Vans parts for an RV12 so I'm having to submit a modification to the LAA. 

The completed fairings all installed.   The Vans forum suggest a 6 knot gain from the wheel fairings due to reduced drag, but probably nothing from the leg fairings.  Anyway, I think it makes it look better!   As you can also see, I now have the registration letters fitted in readiness for ground and flight testing.

Here's the first registration decal being fitted to the left side of the fuselage.  The letters were made up by a local sign-writing company at Fairoaks who do this for us at work.  It's only temporary for testing and will be replaced when the aircraft is painted in the new year.  

 First letter exposed and smoothed-down with a felt squeegee.

 The end result.  A few minor wrinkles and bubbles don't matter.  The painter will do the final version and should do a better job than me! 

 As well as the undercarriage fairings, I've added these Knots2U aftermarket fairings to the cabin entry steps.    Not just cosmetic ( probably no aerodynamic benefit), they close off the hole in the skin where the steps enter, so should reduce draughts (or drafts to US readers!).

 I've completed labeling all of the switches and controls.  The label company didn't quite manage what I'd asked for in accurate spacing, but it's good enough.

And so the finished instrument panel.  All that's missing is the standby compass, which fits to the glareshield which has to be fitted to the canopy frame.  I'll install this at the airfield once it's been padded and trimmed by a local car upholstery shop.  The centre console cover will be fitted once I've completed fuel leak checks.  All of the yellow primed areas will be covered by the interior trim and carpets.

So that concludes the building phase at home in just about three years to the day from starting and about a year later than originally planned.  Now to pack everything and arrange for transport.  I'm intending the hire a self-drive low-loader car transporter and should be able to move the aircraft and wings in two trips (the airfield is only three miles away).
All being well that'll happen in early September.  Thereafter, it's final assembly of major structures, control rigging and start of engine ground testing!


Thursday, 16 August 2018

Lots of catching up!

It's been almost 4 months since my last blog entry and much as happened.  I had a shoulder operation in late May, followed by 6 weeks of no aircraft building and then a gradual return to-work; now after 12 weeks being able to do most things.  In the few weeks before the op and in the most recent six weeks, I've made huge progress, helped along the way by some willing volunteers.

This post will be mostly pictures a a few captions to bring things up to date.

 Big moment -  the engine installation.  Went very smoothly.

 Propeller and spinner.  The spinner was a bit of a pain but looks OK now.

 Cowlings complete.  Not straight forward as it didn't line up with the propeller spinner so needed much rework of mouldings and the main hinge on the right side.  As I've mentioned before, I hate working with fibreglass!

 Exhaust and cooling systems installed.

Oil cooler and hoses.  They really didn't want to reach! 

Avionics wiring finished.  This now includes a Garmin GDL50R traffic and weather receiver. 

Trial fit of the wings.  Needed lots of trimming wing skins and the top of the fuselage cut-out where the spar enters, to eliminate interference.   Thanks to John and Peter ( 2 retired petrol-head dentists).

 Wing installation completed!  Starting to look like a real aeroplane.
The following day I also completed the flaperon control rigging and drilling with help from Martin and Andy - sorry guys  no photos!

 Instrument panel covered in carbon-fibre film and finally installed. The meant wiring of the rocker switches.  Still awaiting labels.

Following the wing installation stage inspection, the control ramp floor went down and first seat belts fitted. 

 Instrument panel fully populated and analogue instruments connected to the pitot-static pipework and leak-tested.  Fortunately no problems.

 Remaining interior painted where needed (areas not covered by carpet or trim) ready for the rear window and fuel tank installation.

 Rear window  installed, canopy inside painted matt black at the front and canopy re-installed.

 Fuel tank and filler neck installed.  Behind the bulkhead, the tank vent system has been installed.  Upper seat belt restraints fitted.

 After over 2 years in storage, the horizontal stab is back on the bench for re-work.  Needs several strengthening service bulletins embodied and I'm fitting the newly released fibreglass tips.

 SBs completed - beefed-up hinge brackets and control horn mountings.  Not too difficult and definitely worth doing now before final assembly or painting.

 Stabilator end ribs removed.  No damaged rivet holes!

 New reversed end ribs being installed .

 The finished job with the new fibreglass tips.  Makes it look better but probably has no aerodynamic benefit!

 The bad news.  Whilst stored in the roof of the garage, moisture has got in between the skin and the blue plastic covering in two sections and started corrosion.  Fortunately it was only light and on the surface so polished out without removing any significant metal.

 More fibreglass - this time the wheel spats and undercarriage fairings.  Here's the left main gear wheel pant on it's first trial fit.

 Both main wheel pants completed apart from fitting the anchor nuts that hold the two halves together.  You can also see the lines inside the engine cowling where the heat shield material has been added and the cooling duct for the oil cooler and radiator.

Finally for the moment the nose wheel pant in progress.  This is the front half waiting for the interface pieces to be epoxied and riveted in place.  

Currently I'm aiming to complete the final construction items in the next two weeks and then move the aircraft to Fairoaks for final assembly and ground testing.  Hopefully no more injuries will get in the way!
Saturday, 28 April 2018

Back under way (for a short while)

The last few months have been frustrating with little progress as my hand healed.  Anyway, it's good enough now to get some work done.  Unfortunately everything will come to a halt in late May when I have a shoulder operation so I'm trying to get as much done before that as I can manage.

First job is to progress the canopy and get the fibreglass skirt laid-up.  It's a job I've not been looking forward to at all.


Here the paper template is laid on the fuselage the mark the correct lay-up position.  The template is then used to cut 5 layers of glass cloth for each side.  Across the centre of the windscreen there will be 10 layers of fabric.

Lot's of masking up is needed to protect the canopy perspex and to create the correct outline of the finished fibreglass.  The parcel tape is covered in car wax to act as a release agent so the finished lay-up can be removed from the aircraft.  Below the yellow tape line, the perspex has been scuffed to create a surface the fibreglass resin will stick to.   To the left of the pivot bolt is an area of foam which has been glued to the canopy frame and sanded to match the fuselage profile.  The fibreglass will stick to this as well as to the windscreen.

This is the first layer of the fabric and epoxy on the right side.  Very messy job!   The left and right sides are done first and allowed to cure overnight and then the centre is laid-up the next day.

After all five layers have been placed, a sheet of peel-ply is placed on top and liberally coated with resin.  When dry, it easily peels away (hence the name) and leave a surface ready for filling or sanding.

This is after the peel-ply has been removed and the initial sanding has taken place.   Next I have to fill any areas that have sunk (where not supported underneath).  The filler is epoxy resin with micro-balloons added to make it light  and easily sandable. 

Here's the filler in the midst of being sanded to final shape. 

After more coats of resin and lots of sanding, this is the final finished canopy skirt having been trimmed to the template dimensions.  The holes for the canopy bolts have been cut out and the foam inside reinforced with more epoxy.


A view with the canopy refitted.  Overall it turned out pretty well.  There are a few small areas that need additional filler and I've completed them using P38 instead of expoxy -  much quicker and no need for additional strength.  It's taken around 3 weeks to do this job and I'm glad it's over!

So on the the engine and preparing it for installation.  I have to install carburettor drip trays so that any overflowing fuel from the float chambers doesn't drip onto the hot exhaust.  I'm also adding a Skydrive carburettor heat system.  This isn't a requirement, but for me just seems like common sense.  Unlike the system on Lycoming or Continental aero engines, it doesn't use hot air from the exhaust shroud into the intake, so there's no loss of power.  Instead it uses small hot water heaters to warm the butterfly ate of the carburettor body.

Here are the carbs on the bench with the heater units installed.  These are pressed onto the  carburettor bodies in a big vice and a risky business if they don't go on square.  There's no way to get them off again if it goes wrong!

This is the left drip tray installed and ready for the carburettor to be refitted. 

And now the carburettor is installed and the fuel pipe reconnected.   Not clear in the picture, but I've also fitted the recently released throttle torsion springs instead of the previous tension springs which were prone to breaking.

The engine mount ring is fitted and the engine is ready to be installed.  Hopefully that'll happen next week.

Final job this time was to install the heater door to the firewall as it's easier to rivet before the engine is fitted.
The tape is holding the heater door shut whilst an RTV gasket cures, which will provide a good air-tight seal.  You can also see the two lower engine mounts which are temporarily fitted to hold the nose landing gear in place.

That's it for the moment.  Stage inspection is due shortly and once the engine is fitted, I can complete the wiring and finally fit the instrument panel