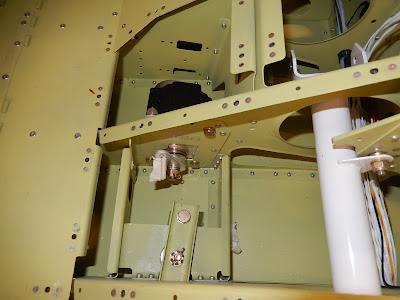
This is the autopilot roll servo installed at the back of the centre fuselage with wiring completed. If the tail cone was fitted I'd have to do this lying down inside the fuselage at arms length! I'm adding tail-cone disconnects for the magnetometer, trim motor and Nav antenna so I can just plug them all together when the two part of the structure are jointed together.
The two connectors on the left are for the attitude/air data computer which hangs on the underside of the baggage bay floor panel. It will also have 3 plastic pipes (pitot, static and AOA).
Here's the autopilot roll servo below the pilot's seat - we're looking down and the front of the aircraft is to the left. Note to self - fit the connecting rod bolt into the operating arm before fitting the servo next time!
Roll servo viewed looking left across the cockpit. The troublesome bolt is now visible and wrapped in tape to keep it in place!
The two avionic cooling fans have gone in. They only use two fixing screws and the instructions say not to over-tighten or the flanges will break. So I made some spacers from spare brake pipe.
The rats-nest of wiring in the foot-well is growing but I won't deal with this for a while - I'm more bothered about items in the centre fuselage and rearwards so that I can finish these with easy access and get the tail cone attached.
So starting to deal with the controls now that all of the wiring is in the centre tunnel. First job - paint then install the flap operating arm and mixer assembly. Getting the mixer to clear the wiring bundle was a real headache!
Another view of the flaperon mixer. You can see the protective cover at the top over the wiring harness - there's just no room left for any extra wiring.
The flap handle mounting at the rear of the control tunnel (the two lugs are for the seat belts). Another tight squeeze so the flap handle cross-tube doesn't rub on the fuel pipe (right side) or wire harness on the left. At least by installing the avionics wing before the controls, I won't have to disturb this or try and feed cables in with the controls attached which I think would be impossible.
The RV12 is designed to met the LSA standard with a maximum weight including fuel and passengers of just 600Kg. So everything has to be light. This picture to me seems to take it to the extreme. At the top is one of the control rods that join the control column to the flaperon mixer for roll control. It's not much thicker than a pencil! At the bottom is one of the push-pull rods that goes rear to the flaperon operating arms.
Finally for this week a bit more wiring. I completed the wing root connections - designed to enable the wings to be quickly removed for transport just like a glider. Above is the right wing connector
This is the left wing connector complete with a pneumatic pipe disconnect for the AOA (angle of attack) sensor. I've now just got to terminate the headset sockets and add a BOSE powered socket and then I can close the wing root panels.


No comments:
Post a Comment